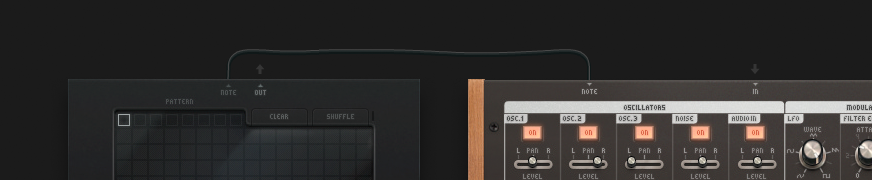
The Pulverisateur is a polyphonic synthesiser. It is a very powerful device and can be used to make a large variety of different sounds, from light floaty melodies to dark heavy-hitting basslines. The Pulverisateur includes 3 oscillators, a noise generator, an audio input channel and amplitude envelope and filter envelope controls as well as a filter and an LFO unit. Unlike some of the other devices the Pulverisateur does not include its own sequencer, this means that the Pulverisateur must be sequenced by either using a Note Track via the timeline or by using another device like the Tonematrix as a sequencer (for maximum editing power using a Note Track is advised). The Pulverisateur can be broken down into easily understood sections:

(Below) example of the Tonematrix being used to sequence the Pulverisateur by utilising the note IN feature
Oscillators
OSC stands for oscillator. These 3 sound sources are where the core sound of the synth can be defined. The three oscillators have the same parameters and can each be programmed to produce exactly the same sound. The only difference being the sync and keyboard track options found on OSC2 and OSC3.
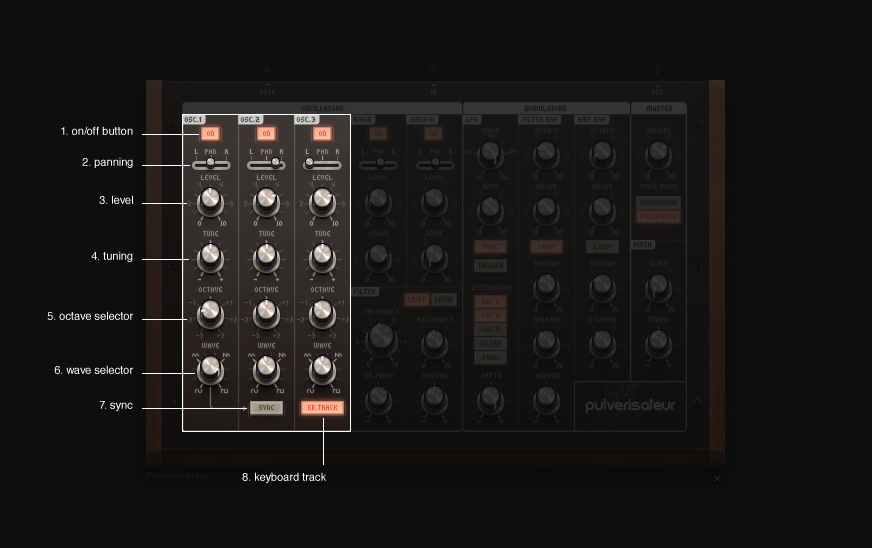
#on/off - Allows for the separate activation of each oscillator.
#panning - Controls the stereo position of each oscillator.
#level - Control over each oscillators individual volume.
#tuning - The tuning controls found on each oscillator allow for fine tuning each oscillator's pitch. TIP! Hold SHIFT and cmd while using the controls for ultra fine tuning.
#octave - Individual octave setting for each oscillator.
#wave selector - The shape of each oscillator. You can smoothly blend from a sinus waveform to a square or directly select the different waveforms (sinus, triangle, saw, square) by clicking on the according waveform symbol.
#sync - Syncs OSC2 with OSC1. The wave being generated by OSC2 will be restarted with the next cycle of OSC1.
#keyboard track - KB track refers to keyboard track. When selected the pitch of OSC3 will follow the pitch of the notes on the note track. If the KB track button is not selected the pitch of the oscillator will stay at a fixed level.
Noise
The Noise unit is an oscillator designed to generate acoustic noise. It can be used at low levels to add warmth or thickness to the synth or it could be used as a root source to create a new sound. For example it is possible to make drum hits or other experimental sounds with the noise unit.

#on/off - Activates or de-activates the noise unit.
#panning - Controls the stereo position of the noise signal.
#level - Volume
#colour - Changes the characteristics of the signal generated by the noise unit.
NOTE: If you want to add noise to an existing sound, lowering the noise level before pressing play is recommended. Watch your ears.
Audio IN
The Audio IN allows you to use the output of another sound source with the Pulverisateur. This means that any signal that is inputed will be affected by the Pulverisateur's filter and filter modulation controls. NOTE: The inputed audio signal will only be heard if the there are notes in the Pulverisateur's note track or on whatever device is being used to sequence the pulverisateur.
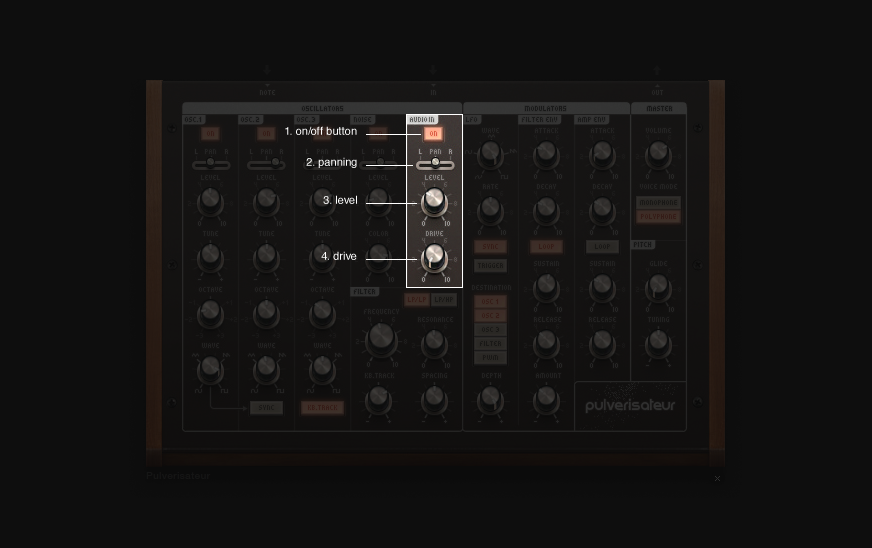
#on/off - Turns the audio input on or off.
#panning - Controls the stereo position of the inputed audio.
#level - Volume
#drive - The drive allows for slight distortion to be applied to the input signal.
Filter
The Filter alters the harmonic content of the combined sound sources. The Pulverisateur has two filter modes, a double lowpass filter (This will cut most of the higher frequencies while passing the low frequencies) and a lowpass/highpass combination (Depending on the filter spacing, this filter type smoothly blends from notch to bandpass).
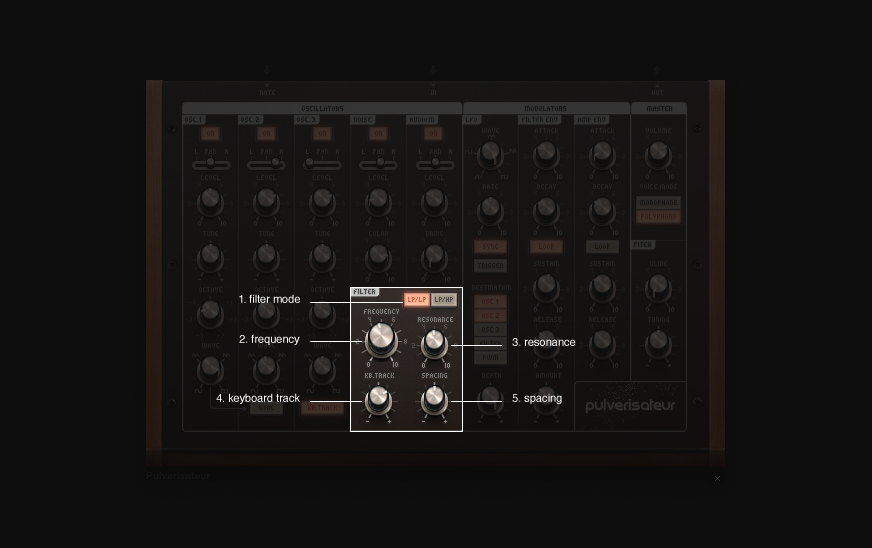
#filter mode - The filter has 2 modes: lowpass/lowpass or lowpass/highpass.
#frequency - Cut-off frequency.
#resonance - Control over the filter's resonance.
#keyboard track - Allows control over how much the filter follows the pitch of the notes on the Pulverisateur's corresponding Note Track.
#spacing - Adjust the difference between the two filter's cut-off frequencies. When set to 0 both filters have the same cut-off frequency.
Modulators
The modulators consist for 3 units, the LFO, the filter envelope and the amplitude envelope. Once the sound of the synth has been created using the Pulverisateur's different sound sources the modulation units can be used to vary or modify the properties of the waveform further.
LFO
LFO stands for low-frequency oscillator. The LFO is an electronic signal generator that gives a rhythmic pulse or sweep, this pulse or sweep can be used to modulate the synths audio signal.

#wave selector Select the shape of the LFO. Like the OSC. waveform selector you can click on the waveforms to turn the knob into concrete positions or smoothly blend between the different shapes.
#rate - Adjusts the speed of the LFO.
#sync - Syncs the rate of the LFO with the tempo of the song.
#trigger - Restarts the LFO with the start of each note note.
#destination - Which oscillators or sound sources are modulated by the LFO. Selecting OSC1, OSC2 and OSC3 activates pitch modulation with oscillators 1, 2 and 3. FILTER activates modulation of the filter cut-off frequency. PWM means all oscillators will be phase modulated.
#depth - Adjustment of the LFO's amplitude. If the depth is set to 0 the LFO won't have any effect, regardless of the other parameter's settings.
Filter and AMP modulators
The envelopes give a lot of power in terms of how much they can affect the sound being generated by the synth. The pulverisateur has two envelopes:
*Filter envelope: Affects the filter's cut-off frequency.
*AMP envelope: Affects the amplitude of every single note.
It is important to note that the diagram below only labels one of each of the controls, this is because both the filter envelope and the AMP envelope work in the same way only one is affecting the filter and the other the AMP.
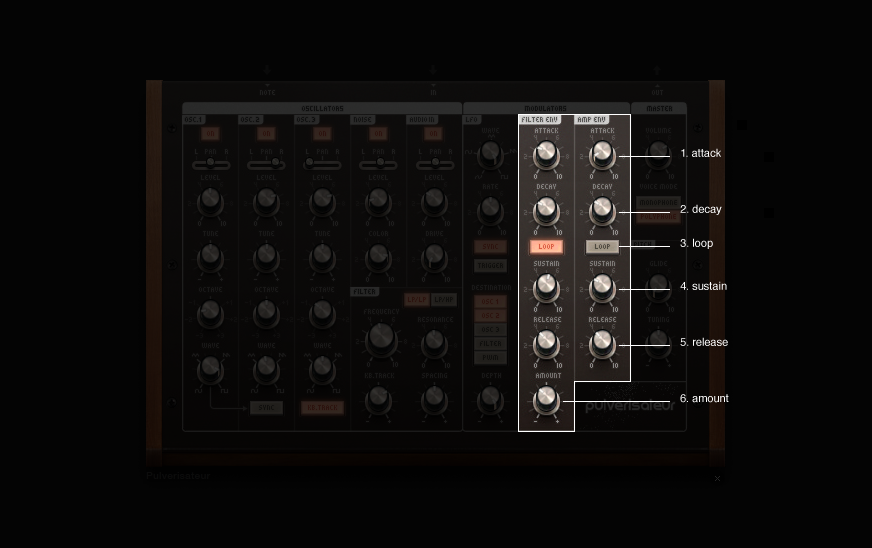
#Attack - The speed at which the filter/AMP starts once it has been triggered.
#Decay - The speed at which the envelope goes from attack to sustain.
#Loop - Will loop the decay phase of the envelope.
#Sustain - How long the envelope stays open.
#Release - How long the envelope stays open after the sound has stopped.
#Amount (Filter level only) - Controls how much the envelope affects the filter's cut-off frequency.
Master
The Master includes output volume control and the output itself (just above the master volume control). The master also includes the Pulverisateur's master tuning control.
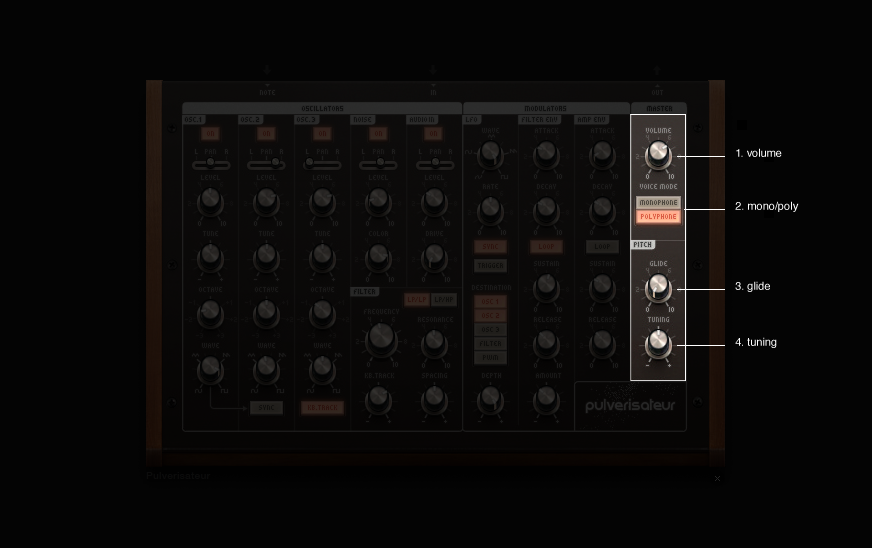
#volume - Master volume, the volume of the output signal.
#mono/poly - When the device is set to mono it means that the Pulverisateur will only play one note at a time. When set to polyphonic the Pulverisateur will be able to play multiple notes at one time, making it possible for chords to be played.
#glide - Allows definition of the speed at which the note glides from the pitch of the previous note into the pitch of the next note.
#tuning - Allows fine tuning of all oscillators at once.
Comments (27)
what synthesiser is it inspired from?
i would say design-wise it was probably based off of the Minimoog
how to connect the midi keyboard to this thing?
just right click on the synth and press "setup midi", if you can't see it it should say "No Midi Avaliable" at the top of the list, and it means your midi keyboard is not plugged in or it's drivers are not downloaded or it's broken
Make sure your MIDI controller is connected to your computer (direct USB connection or MIDI connection through an interface), choose "Window > MIDI Setup" on the top menu bar and make sure that your controller is listed under the Devices tab. If you press keys or turn knobs (if any) on your controller, you should see MIDI messages to the right of your device. Press Done to close the window. Right-click and choose Learn MIDI Keyboard on your Pulverisateur. Then press nay key on your controller. You've just established the connection between them.
how can you pitch the audio
Did you try the "tuning"-knob?
yes and nothing happens
Do you use Osc1-3? "Audio" and "Noise" won't react on this knob as they're no oscillator.
You can also tune the oscillators 1-3 individually using their tuning or octave knob.
Questions about the Pulverisateur and comments on the manual:
(1) It may be nice to add that it is a subtractive synthesiser and a brief on what that means in context.
(2) Is the granular control between the oscillator waveform amount (66.67% - 100%, aka saw - square) also pulse width amounts?
(3) Typo: "The modulators consist for 3 units" should be "The modulators consist of 3 units"
(4) Consideration: "The speed at which the filter/AMP starts once it has been triggered" can be changed to "The speed at which the envelope starts once it has been triggered" to stay understandably consistent with the other labels
(5) I'd like to come up with visual representations of certain parameters, perhaps I could pick that up with @chordofdestruction who seems to be more of a wizard at this c;
how do i import a midi file ive clicked everything and it doesnt work
Right-click on an empty area of the synth (outside of a control) and choose Import MIDI File on the context menu. Choose your local file and load it. New note tracks will appear in the timeline for each track in the MIDI file (usually one) and a note region inside with the contents of your MIDI file. If your import isn't successful, perhaps your MIDI file is corrupted. Test if you can play it in your computer.
Question on filter spacing - I'm imagining in my head a frequency spectrum with 2 lines.. with the first line from the right being the cut off for high freqs and the 2nd line being the cutoff for low freqs. So when filter spacing isn't 0, is this like an inverted notch filter where the space in between is filtered out?
Yes, as long as the filter mode is set to LP/HP, that's correct.
thanks!!!
I'm using this to make a dope remix of Medic from TF2 and I want the notes to be more staccato. how do I do that?
Shorten note duration and/or envelope attack and decay.
what do you put in the note section and how do you do it?
The note input connector accepts notes coming from another device that generates them. Connect the note output of the Tonematrix, the Matrix arpeggiator or the note splitter to it with a cable.
Thanks!!!
Any reason why my sawtooth waveform won't play? Everything sounds like a sine wave. I have adjusted all three osc's to sawtooth and it doesn't change the timbre at all.
Make sure you don't have automation on the oscillators. They will override the position of the knob.
I cannot connect the synth to the mixer, is it because I am on mac? I am double clicking and click and dragging it but it does not work. Should I get a mouse?
It should not matter what input device you use. As long as you can click and drag from an input to an output of the same class, you'll create a cable. Also, do you have the same problem with other devices? If it's only the Pulverisateur, check that you're not trying to connect from the note output.
For a better overview of your requests, we ask you to post questions about help for this device on our HELP board https://www.audiotool.com/board/support
And if you have found a bug, post it here at the bug reports https://www.audiotool.com/board/bug_reports
Thanks